-
LabBook Connect v1

-
One of the major challenges in implementing a Laboratory Information System (LIS) is its integration with various laboratory analyzers.
LabBook addresses this issue with its middleware called “LabBook Connect”. This middleware acts as a bridge between the LabBook LIS and laboratory analyzers. It ensures secure and seamless data transfer, integration, and management.
The middleware therefore helps reduce the risks of errors associated with manual entry and increases laboratory productivity.
List of supported analyzers:
Analyzer management is based on independently developed plugins/connectors. Several connectors have already been developed; however, only those that have been tested and validated under real laboratory conditions are currently published on the Mérieux Foundation’s GitHub repository :
https://github.com/fondationmerieux and are available for download on the LabBook website. : https://www.lab-book.org/telechargements/ . This list will be gradually expanded as other connectors are evaluated and validated in real-world environments.
Installation and Configuration :
Version 3.6 is the minimum required version to benefit from this infrastructure and the latest functional improvements, including mapping, new tests, and pop-up interfaces. In this setup, LabBook Connect runs in its own application container, separate from the LabBook container. This separation allows the middleware to be operational as soon as the system starts, enabling communication with your analyzers.
Configuration :
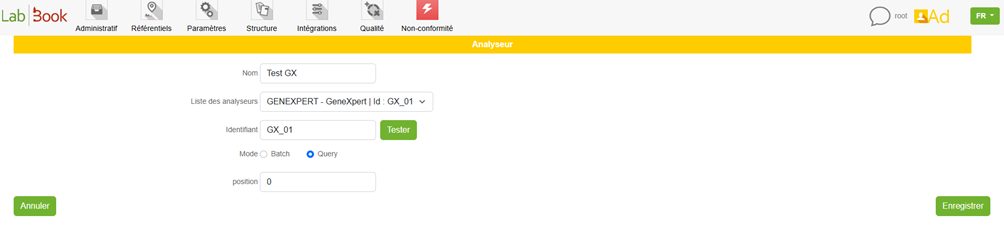
To configure it, you must log in as root and click on Integration, then Analyzer Configuration..

Once on the page, click on Connect and enter the IP address.

Import the three required files, then return to the “Analyzer List” page .

Add an analyzer :
Communication diagram between GeneXpert, DX system, and LabBook Connect.

Sending results to LabBook:
In LabBook, you must first create a new test request, then add the tests (which exist in GeneXpert).
On the DX System, to transfer completed results, click on View Results, then on the Upload Test button, select the tests to send from the list, and finally click Upload.
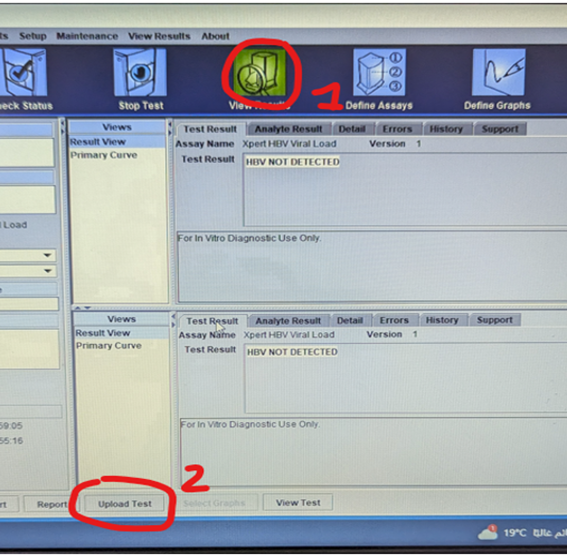
If the entire process is followed correctly, the results sent by GeneXpert are automatically inserted into the variable fields in Result Entry.
-
 Speaker : Anja RAMILSON
  Duration : 5'52 min
  Direct link to YouTube
 This video is in French. Enable subtitles to read the translation.
 -
 Speaker : Anja RAMILSON
  Duration : 6'57 min
  Direct link to YouTube
 This video is in French. Enable subtitles to read the translation.
If you continue browsing this website, you agree to our policies:
x
LabBook Connect v1
Top Block Position
Bottom Block Position